

Excel Export to CSV: Steps, Fixes and Encoding Checks
Excel Export to CSV: Steps, Fixes and Encoding Checks
The usual advice to click Save As misses the part that matters: checking what the receiving app will import. For a reliable Excel export to CSV, activate the required worksheet, choose File > Save As, select CSV UTF-8, and save a separate copy. Then check the raw file and test the import before using the records.
Table of Contents
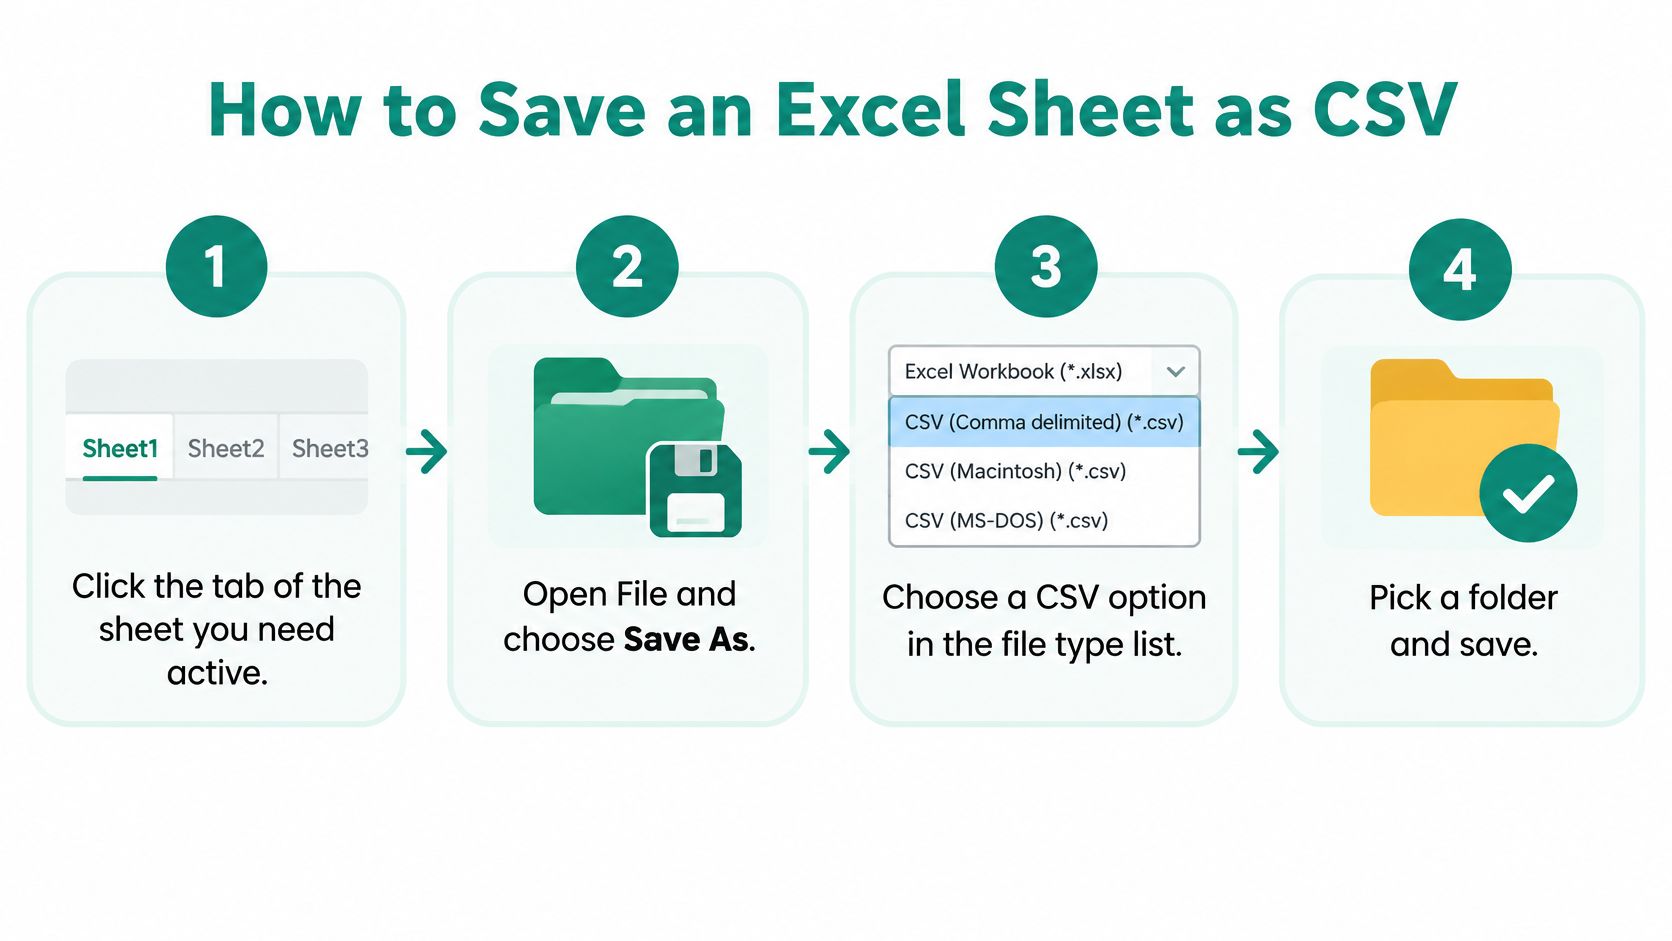
How to Save an Excel Sheet as CSV
Make the required sheet active, open File > Save As, choose a CSV format, select a folder, and save. That creates the export, but it doesn't prove the file is ready for another system.
Before starting, prepare any sheet containing merged cells, formulas or mixed text and number columns. Keep the original workbook saved as an .xlsx file so the export doesn't become the only remaining copy.
Follow the desktop save sequence
Click the required worksheet tab. Excel saves the active sheet to CSV, not every tab in the workbook. Check the tab name rather than relying on whichever sheet happened to open first.
Select File, then Save As. Use the desktop application for this workflow. If the workbook hasn't been saved yet, save the Excel master before creating the CSV copy.
Choose a folder and enter a filename. Use a name that identifies the dataset and export date. Keep exports separate from files that have already passed validation.
Open the file format list. On Windows, this is normally Save as type. On Mac, look for File Format.
Select CSV UTF-8 (Comma delimited) (*.csv). UTF-8 is the safer starting point for names, addresses and multilingual text. The recipient still needs to interpret the file using the matching encoding.
Click Save and accept the feature warning. Click OK, Continue or the equivalent confirmation that some workbook features won't be kept. If Excel asks whether to retain the CSV format, confirm that choice for the export copy.
Open the new file in Notepad or TextEdit. Use a plain-text view. Check that the first record contains the intended headers and that commas separate the values, unless the recipient explicitly requires another delimiter.
Keep the handoff separate from the master
Don't continue editing the CSV as though it's the workbook. Close the exported copy and return to the .xlsx master for corrections, then generate a fresh export.
Practical rule: A successful save confirms that Excel wrote a file. It doesn't confirm that the receiving app will read the intended records.
The result is a CSV extract of the selected sheet. Treat it as pending validation until its structure, characters and imported values have been checked.
Pick the Right Save Option for Your Excel Version
| Platform | Save option to choose | Encoding | Best for |
|---|---|---|---|
| Excel for Windows or Mac (desktop) | CSV (Comma delimited) | System default, ANSI on Windows | Older tools that ask for a legacy encoding |
| Excel for Windows or Mac (desktop) | CSV UTF-8 (Comma delimited) | UTF-8 | Names, addresses and any non-English text |
| Excel for the web | Not available for direct CSV save; download to desktop Excel first | Not applicable | Editing in the browser, then exporting from the desktop app |
| Desktop Excel with a semicolon list separator, common in parts of Europe | Same CSV options; delimiter follows regional settings | UTF-8 or ANSI, as chosen | Receiving apps that expect semicolons rather than commas |
The desktop options look similar, but encoding changes how software interprets the stored characters. Plain CSV may suit a legacy application with a documented import requirement. It isn't the best default merely because the option appears familiar.
CSV UTF-8 is the practical choice for contact lists containing international names and addresses. A team exchanging records across the UK, US, Europe and India shouldn't assume that every recipient uses the same system encoding.
Match the recipient, not just the filename
Excel for the web requires a different route: download the workbook and perform the export in desktop Excel. Browser editing and desktop export can remain separate parts of the workflow.
Regional settings introduce another distinction. A .csv extension doesn't guarantee comma-separated fields, because desktop Excel may use the configured semicolon list separator. Encoding and delimiter are separate choices: UTF-8 doesn't force the file to use commas.
The working rule is straightforward: choose CSV UTF-8 for names, addresses and non-English text. Choose plain CSV only when the receiving tool explicitly requires an older encoding, and establish its delimiter requirement before handing over the file.
Prepare the Sheet Before You Export
CSV preparation starts with the actual data region, not the workbook's appearance. A sheet that looks tidy on screen can still contain blank records, ambiguous dates or identifiers that Excel has already changed.
Normalise the export area
Start the data block at A1. Place a single header row above the records. Use clear, unique names such as
company_name,work_emailandsignal_date, rather than decorative titles above the table.Unmerge cells. A merged area doesn't become a repeated value across the exported records. Fill the intended value into each relevant row instead of leaving gaps that another app must interpret.
Remove internal blank rows and columns. Keep the export region rectangular. Don't delete meaningful empty field values, such as an unavailable mobile number, just to make every cell look complete.
Replace context-dependent formulas with values. In an export copy, copy the required cells and use Paste Special > Values. Resolve formula errors before saving rather than letting error text enter the receiving system.
Protect identifiers as text. Set phone, account ID and postcode columns to Text before entering or pasting values. Applying Text format afterwards won't restore leading zeros or digits that Excel has already changed.
Make dates unambiguous. Where the destination requires a strict format, generate
yyyy-mm-ddtext and paste the resulting values into the export sheet. Changing the visual date format alone isn't a substitute for checking the exported text.Check the dataset's size. Microsoft's text import and export guide states support for up to 1,048,576 rows and 16,384 columns. Larger datasets need a different transfer workflow.
Prepare the worksheet that will actually be exported, not a similar tab or a workbook-wide preview.
For example, a lead list on Sheet1 and prospect notes on Sheet2 require separate exports or prior consolidation. If the notes must travel with each lead, join them into the same export sheet using a stable identifier rather than expecting the recipient to reconstruct the relationship.
What a CSV File Keeps and Drops
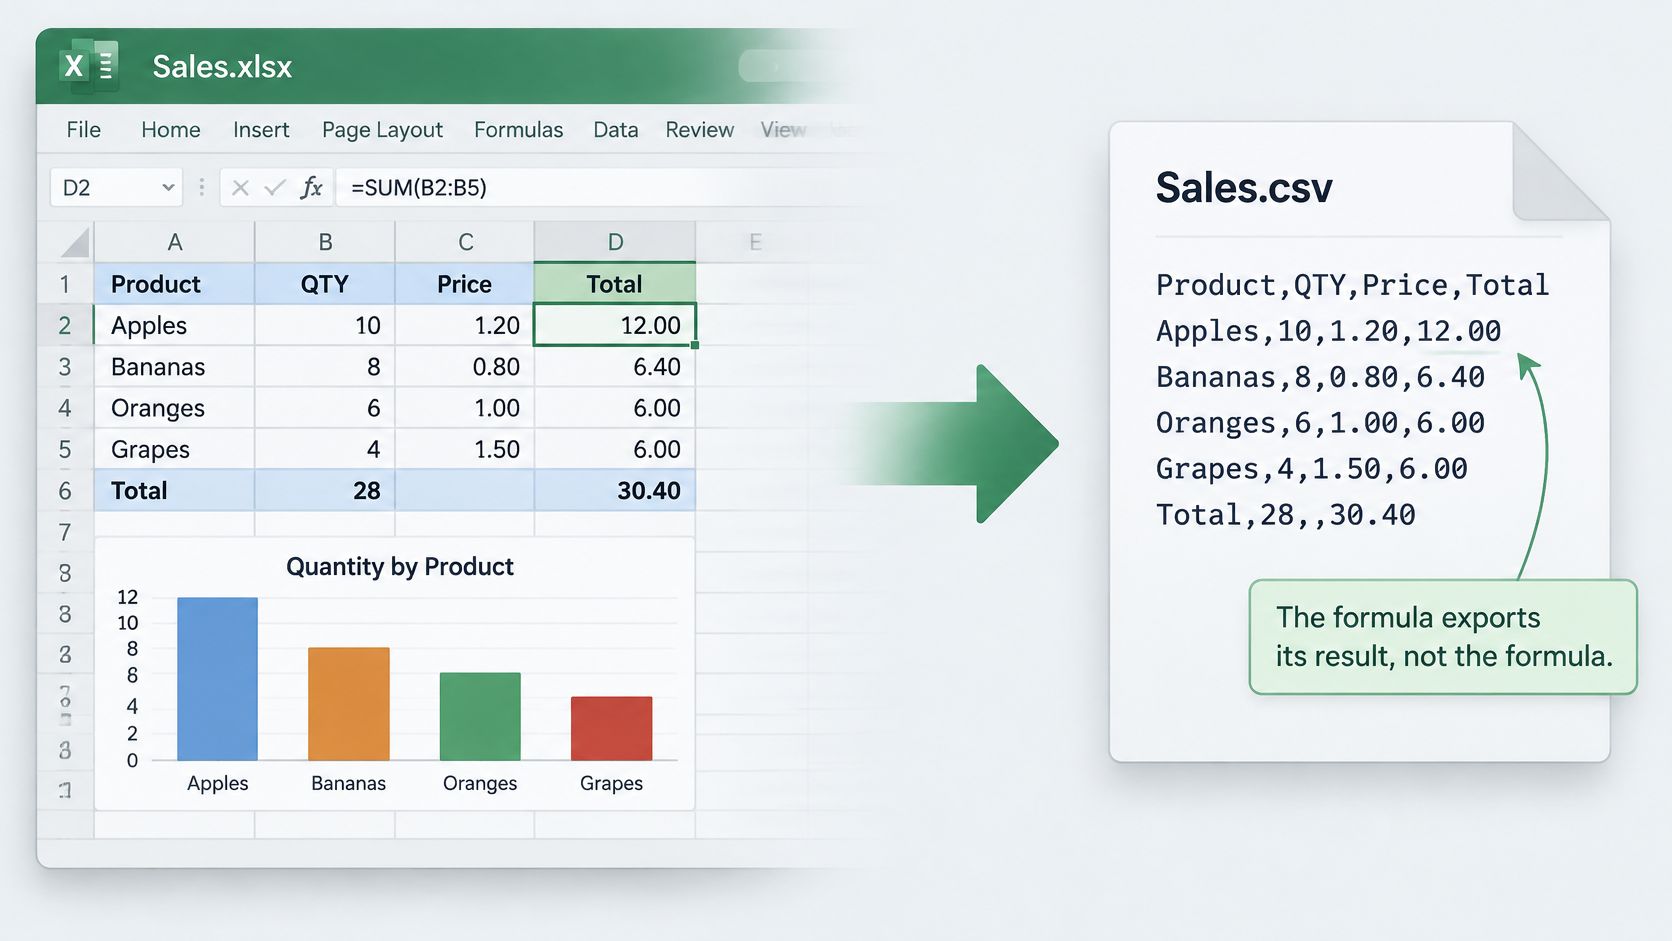
A CSV file doesn't preserve workbook logic. Microsoft's guide to features lost during conversion explains that CSV retains the text and values displayed on the active worksheet, rather than the full workbook and its features.
A formula therefore becomes its displayed result, not a calculation that the recipient can inspect or recalculate. Charts, colours, cell formatting, column widths and workbook structure aren't represented in the CSV.
Decide whether the recipient needs data or a workbook
Say a calculated total displays as £1,250. The export contains that displayed text, quoted to protect the comma, rather than the formula that produced it. A recipient can't use the CSV alone to trace the calculation or update its dependencies.
This trade-off is useful for a database or prospecting import. The receiving application needs fields and records, not spreadsheet presentation. But meaningful information stored only in colours, comments or charts needs to become explicit columns before the handoff.
| Recipient needs | File to retain or provide |
|---|---|
| Rows and values for an import | CSV extract |
| Editable calculations and spreadsheet presentation | .xlsx workbook |
| Several related worksheets together | .xlsx workbook |
CSV is a portable extract, not a reversible backup. Keep the .xlsx as the master and create a CSV copy for each handoff. If workbook features are part of the deliverable, provide the workbook rather than expecting CSV to carry them.
Fix Encoding, Delimiter and Quote Problems
Shifted columns and broken accents usually mean the receiving app interpreted the file differently from the exporter. CSV has no universal built-in declaration that tells every application which encoding and delimiter to use.
Microsoft's worksheet-to-CSV guidance documents the desktop CSV options and the limitation on direct CSV saving in Excel for the web. Choosing the right option is only the start of compatibility testing.
Establish the import settings
- Identify the destination. Read its import requirements for encoding, delimiter, header names and date formats. Use those requirements instead of assuming that its CSV defaults match Excel's.
- Use UTF-8 for multilingual records. If names look corrupted, return to the intact workbook and export again. Resaving already corrupted text won't recover the original characters.
- Test through Data > From Text/CSV. Select the encoding and delimiter explicitly, then inspect the preview. Double-clicking the file leaves more interpretation to Excel's automatic behaviour.
- Check the UTF-8 marker requirement. Some Excel-oriented recipients need a byte order mark to recognise UTF-8 reliably. Some automated parsers require it removed, particularly when they treat it as part of the first header.
Where the list separator is wrong, set the delimiter in the From Text/CSV dialogue for the import. Avoid changing Windows regional settings merely to inspect a file, because that change affects other programs too.
Export symptoms, causes and fixes
| Symptom | Likely cause | Fix |
|---|---|---|
| Columns shift to the right | Commas inside text aren't quoted, or a semicolon delimiter is expected | Check the receiving app's delimiter and confirm quoted fields in the raw file |
| Accents or non-Latin characters look wrong | Legacy encoding instead of UTF-8 | Re-save from the intact workbook as CSV UTF-8 and re-import |
| Leading zeros vanish from IDs or postcodes | Excel converted text to numbers | Restore original values and format those columns as Text before export |
| Extra rows appear | Line breaks inside a cell | Remove unnecessary line breaks or confirm the field is correctly quoted |
| Only one tab appears | Export covers the active sheet only | Export each required sheet separately |
| Dates change or read as the wrong day | Regional date interpretation | Convert dates to yyyy-mm-dd text before export |
Don't repair quote problems by deleting every comma or quotation mark. That changes legitimate company names, addresses and notes. Correct the export or parser configuration instead.
Selecting CSV UTF-8 isn't the final compatibility test. Validation in the destination app is the real export step.
Check the File and Confirm the Import
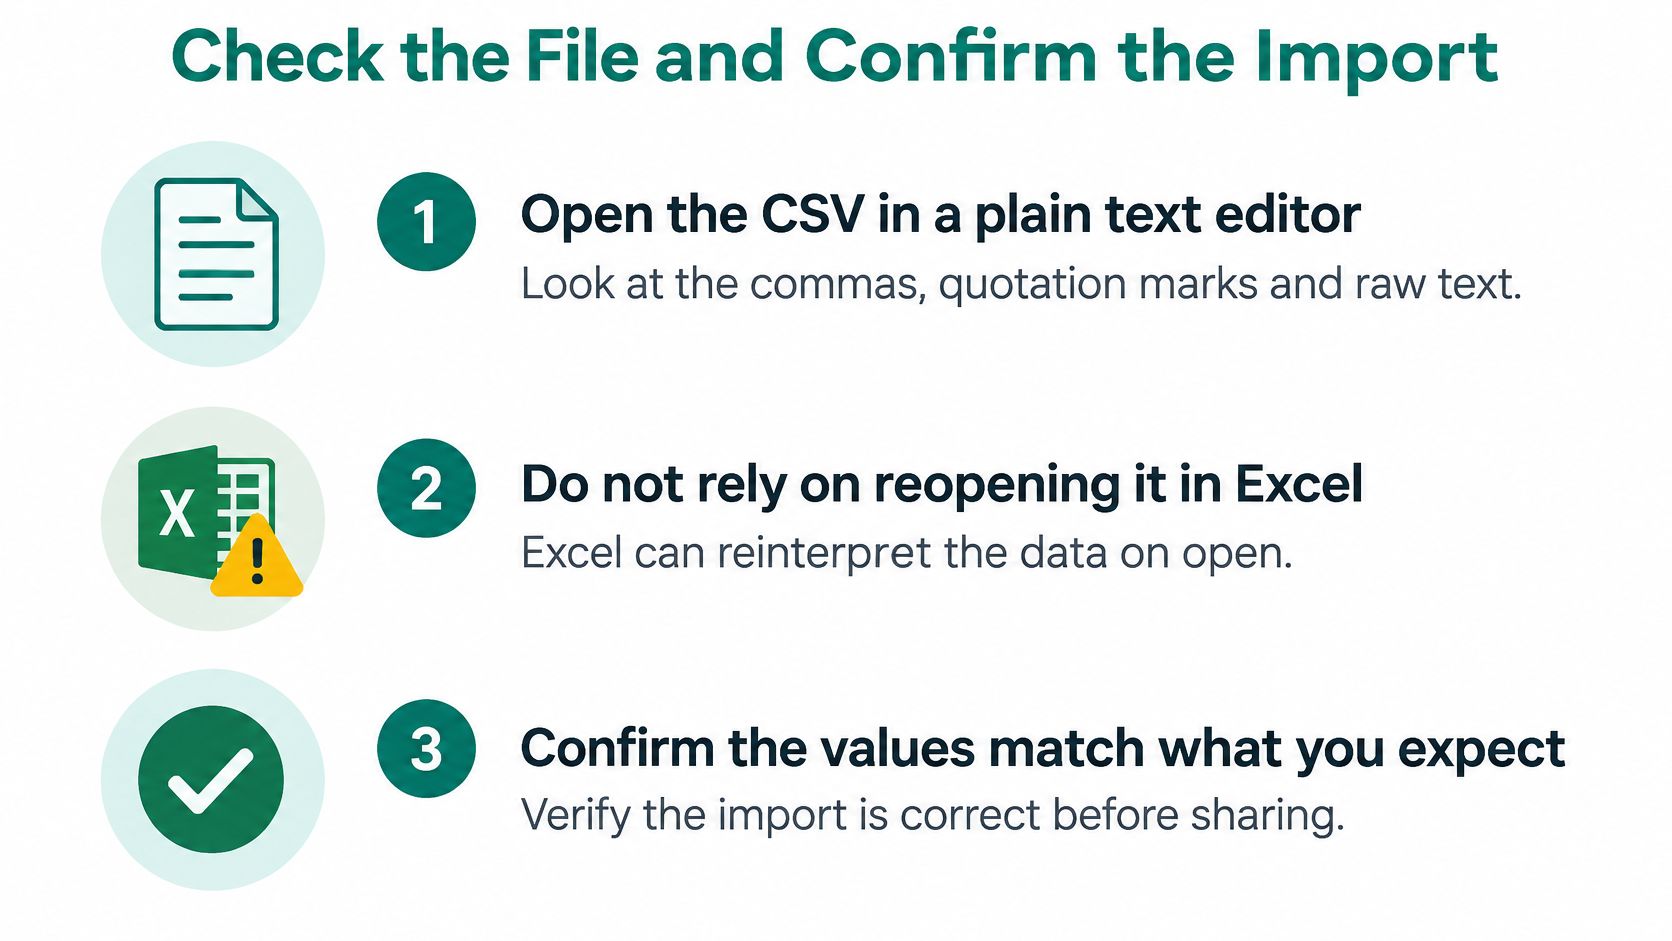
Reopening a CSV in Excel proves nothing about the file itself. Excel reinterprets identifiers and dates on opening, so a tidy worksheet preview can sit on top of broken text underneath.
The Library of Congress CSV format description identifies RFC 4180 as the principal documentation reference. Its conventions describe comma-separated fields, CRLF record endings and consistent field counts, with double quotes protecting fields that contain commas, quotes or line breaks. Those rules give you something concrete to check the raw file against.
Inspect the text, then parse the records
Open the raw file. Inspect it in Notepad, TextEdit in plain-text mode, or another text editor. Check delimiters, quotation marks and line endings without letting Excel reinterpret the values.
Check the header and field structure. Confirm the intended header appears first. Embedded quotation marks must be doubled inside a quoted field, and each parsed record should match the header's field count.
Compare record counts. Match parsed data records against source data rows, excluding the header. A note field containing a quoted line break still counts as one record, so count parsed records, not visible text lines.
Spot-check vulnerable values. Inspect accented names, leading-zero postcodes, dates, empty trailing fields and multiline notes. Compare them directly with the source, not with memory.
Use an independent parser when practical. Python's
csvmodule can report parsed record counts and field counts per row. A file that parses without errors still needs the content checks above, because a parser accepts any well-formed text, including well-formed wrong data.
Confirm the destination records
Import into the receiving app and verify its record count and header mapping against what the parser reported. As a practical acceptance check, inspect a sample of five rows, including records with awkward characters or notes. If there's a verified email column, confirm addresses haven't shifted into adjacent fields, since a shifted address looks valid and still bounces.
For recurring transfers, add checks for missing required values, duplicate identifiers and unexpected headers. The CSV revision draft treats spaces as significant, so decide whether to trim values as a deliberate rule instead of leaving it to whatever the importer does by default.
Every SignalVan lead list can be exported to Excel. For signal-first prospecting, preserve the buying signals, source dates and timing alongside the contact fields, then re-export after a fresh signal run. The reason for approaching an account matters as much as the address.
Keep the .xlsx master and retain each validated CSV as a dated handoff copy.
SignalVan finds companies showing buying signals such as requests for help, hiring activity, new appointments, company news and public tenders, supplies mailbox-checked work emails and carrier-verified mobile numbers for decision-makers, and drafts the first message for approval and sending through the customer's own Smartlead account. Its Excel exports provide the starting point for the checked CSV handoff described here. Paste your website at signalvan.com to see who's ready to buy this week.
Keep reading

What Is ABM: Account-Based Marketing for B2B Teams
What Is ABM: Account-Based Marketing for B2B Teams

Who Are the Decision Makers in B2B: How to Find Them
Who Are the Decision Makers in B2B: How to Find Them

10 B2B Lead Generation Services 2026: Which Fits Your Team
10 B2B Lead Generation Services 2026: Which Fits Your Team
Start with your website.
See your first leads, with the reason each one is there.